# git-workshop
*2022-05-12, done while I was at [Aragon ZK Research](https://research.aragon.org/) group.*
## Table of contents
- [1. Main idea](#1-Main-idea)
- [2. Useful commands](#2-Useful-commands)
- [2.1. Your local config](#21-Your-local-config)
- [2.2. Creating branches](#22-Creating-branches)
- [2.3. Committing](#23-Committing)
- [2.4. Seeing the git history](#24-Seeing-the-git-history)
- [2.5. Pushing to the remote repository](#25-Pushing-to-the-remote-repository)
- [2.6. Amending commits or how to modify the history](#26-Amending-commits-or-how-to-modify-the-history)
- [2.7. Rebase and Squash](#27-Rebase-and-Squash)
- [2.8. Cherry pick](#28-Cherry-pick)
- [2.9. Rebase branch](#29-Rebase-branch)
- [3. Examples](#3-Examples)
- [3.1. research-blog branches](#31-research-blog-branches)
- [3.2. An example of a flow using a branch](#32-An-example-of-a-flow-using-a-branch)
- [4. Useful terminal tools](#4-Useful-terminal-tools)
- [5. Useful resources](#5-Useful-resources)
- [Acknowledgements](#Acknowledgements)
## 1. Main idea
Git is a **distributed version control system**, which is used for collaborative code editing to keep track of code changes.
Git is not the same than Github, Github is a remote repository that uses Git.
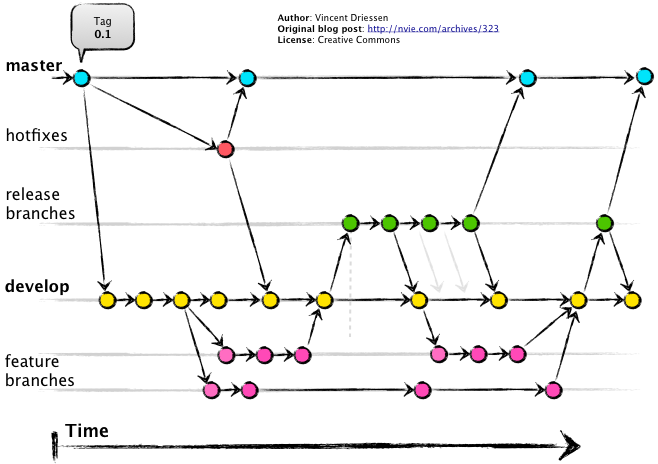 *(src of the diagram: https://nvie.com/posts/a-successful-git-branching-model/ )*
## 2. Useful commands
Along this section, might be useful to try to reproduce the operations showcased in this tool: https://git-school.github.io/visualizing-git/
### 2.1. Your local config
It's important to tell to git who are you: in `.gitconfig` file:
```
[user]
email = your@email.com
name = yourname
```
Alternatively, you can also configure it directly from the command line:
```
git config --global user.email "your@email.com"
git config --global user.name "yourname"
```
Now, you can print your config to confirm that everything is fine:
```
git config --global -l
```
Take in mind, that in Github, it only shows your commits authorship in which the author's email matches your Github configured email.
### 2.2. Creating branches
For repositories where there is more than one person working, it's a good practice to use branches. In this way, the other people can review the changes from the branch before moving them to the `main`/`master` branch.
To create a new branch:
```python
# first ensure that we have the last remote changes of the main branch:
git checkout main
git pull origin main
# we proceed with the branch creation:
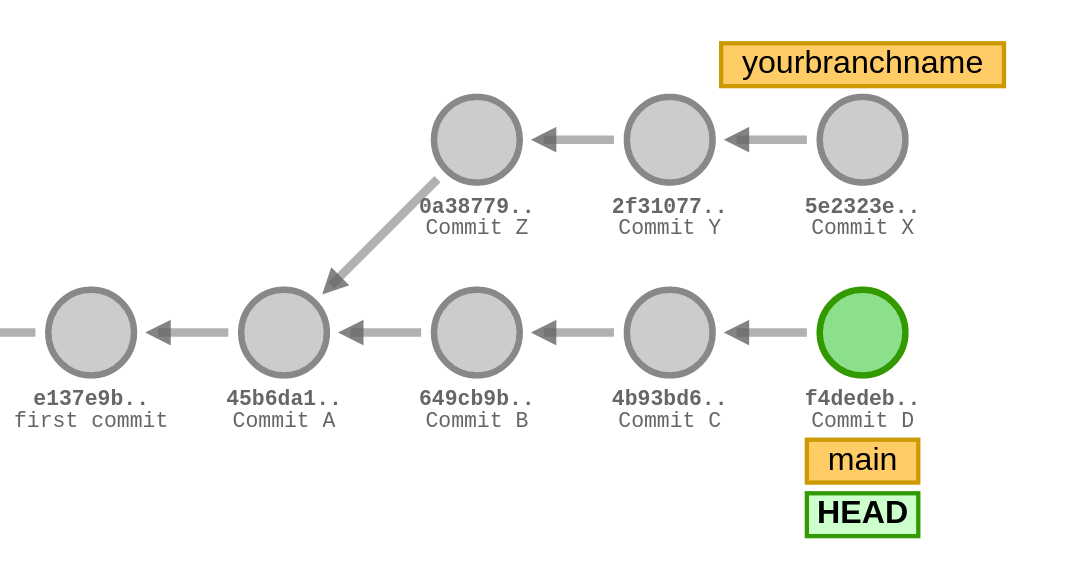
git branch yourbranchname
```
Now this new branch `yourbranchname` is a pointer to the last commit, which is also pointed by the `main` branch. If we now add a new commit to the `yourbranchname` branch, it will diverge from the `main` branch.
(Also you can use `git checkout -b yourbranchname`, which will create the new branch and move to it)
*(src of the diagram: https://nvie.com/posts/a-successful-git-branching-model/ )*
## 2. Useful commands
Along this section, might be useful to try to reproduce the operations showcased in this tool: https://git-school.github.io/visualizing-git/
### 2.1. Your local config
It's important to tell to git who are you: in `.gitconfig` file:
```
[user]
email = your@email.com
name = yourname
```
Alternatively, you can also configure it directly from the command line:
```
git config --global user.email "your@email.com"
git config --global user.name "yourname"
```
Now, you can print your config to confirm that everything is fine:
```
git config --global -l
```
Take in mind, that in Github, it only shows your commits authorship in which the author's email matches your Github configured email.
### 2.2. Creating branches
For repositories where there is more than one person working, it's a good practice to use branches. In this way, the other people can review the changes from the branch before moving them to the `main`/`master` branch.
To create a new branch:
```python
# first ensure that we have the last remote changes of the main branch:
git checkout main
git pull origin main
# we proceed with the branch creation:
git branch yourbranchname
```
Now this new branch `yourbranchname` is a pointer to the last commit, which is also pointed by the `main` branch. If we now add a new commit to the `yourbranchname` branch, it will diverge from the `main` branch.
(Also you can use `git checkout -b yourbranchname`, which will create the new branch and move to it)
 Usually, the name of the branch tries to reflect what you're adding in that branch (eg. if you're adding an introductory article on lattice cryptography, the branch can be named `intro-lattice-cryptography`).
If you're fixing something, it's a common practice to specify it in the branch name (eg. `fix/typo-lattice-article`).
If you want to move to an already existing branch, you can use:
```
git checkout the_already_existing_branch_name
```
### 2.3. Committing
We assume that we edited some files and we want to commit the changes, we'll use:
```python
# first let's check which files have changes:
git status
# to add the edited files:
git add .
# we can run again the 'status' command, to see that we added the edited files:
git status
# we're ready to commit the changes:
git commit -m "this is the commit message"
```
**Important**: The commit message should describe the changes that we are adding in the commit, so later when revisiting the git history logs, another person can get the context on what has been modifyied in each commit.
**Note 1**: the commit message can have multiple lines, the first line should not be longer than 50 characters.
To do a new commit with multiple lines, you can just use `git commit`, and your configured text editor will open to edit the commit message.
**Note 2**: notice that we committed the changes to our local version of the repository. The remote repository (eg. in Github) does not have our last commit yet.
### 2.4. Seeing the git history
```
git log
```
For other visualization useful tooling, check the [Useful terminal tools](#4-Useful-terminal-tools) section.
### 2.5. Pushing to the remote repository
We have committed some changes to our branch, and we want to push those changes to the remote repository (eg. hosted in Github).
In order to push to the remote branch:
```
git push origin yourbranchname
```
And now, from the Github web we can open a PullRequest (usually named 'PR').
### 2.6. Amending commits or how to modify the history
Imagine that we did a commit, but we want to 'edit' it. We can edit it with the 'amend' command:
```python
# once the files are edited, let's track the changes:
git add .
# now instead of creating a new commit, we amend the last one:
git commit --amend
# here the text editor will be triggered, so we can edit the commit message
```
If the old commit was already pushed to the remote repository (eg. Github), now our local commit looks different from the equivalent remote one (and their hashes will differ). If we are in a un-protected branch, we can force the push, which means that despite the remote repository already has the equivalent commit, we will overwrite it with our amended commit:
```
git push origin yourbranchname --force
```
Be aware, that with `--force` you're overwriting the remote commit, so is a flag that should be used with extreme care, as we could delete relevant code.
### 2.7. Rebase and Squash
Imagine that you have a git history that looks like:
```
commit 2547306f0bc9199f34ada8e72b706968752e94eb (HEAD -> yourbranchname, origin/yourbranchname)
Author: username
Date: Mon May 9 15:17:19 2022 +0200
Fix typo on the description
commit a2ab24314c86b7f8a6a980aa3b57dd5fe339b14e
Author: username
Date: Mon May 9 13:32:40 2022 +0200
Update intro-lattice-cryptography.md
commit 31aea34e1ab381ae14f5a97e189da12510896536
Author: username
Date: Mon May 9 13:21:01 2022 +0200
Update intro-lattice-cryptography.md
commit 2ca12c978966943f8400eccdc3f7703f78f77fed
Author: username
Date: Mon May 9 13:13:23 2022 +0200
Add intro-lattice-cryptography.md
commit f9068940b8cb96647f306ba094b7931031b8b4fb (origin/main, origin/HEAD, main)
Author: username
Date: Mon May 9 13:09:53 2022 +0200
Update css style
```
Assume that the last 4 commits are updates to the same file (`intro-lattice-cryptography.md`). In order to keep a more clean git history, we may want to combine all those 4 commits into a single one. We can do it with:
```
git rebase -i f9068940b8cb96647f306ba094b7931031b8b4fb
```
Notice that `f9068940b8cb96647f306ba094b7931031b8b4fb` is the hash of the commit previous to the one until where we want to edit the commits.
Now we will be displayed with the text editor showing the following:
```
pick 2ca12c9 Add intro-lattice-cryptography.md
pick 31aea34 Update intro-lattice-cryptography.md
pick a2ab243 Update intro-lattice-cryptography.md
pick 2547306 Fix typo on the description
```
We now can edit it changing the `pick` by `squash`/`s` at those commits that we want to squash with the previous one:
```
pick 2ca12c9 Add intro-lattice-cryptography.md
s 31aea34 Update intro-lattice-cryptography.md
s a2ab243 Update intro-lattice-cryptography.md
s 2547306 Fix typo on the description
```
With this, what we are doing is 'squashing' the 3 last commits into the first one (`2ca12c9`).
Now, if we run `git log`, we will see:
```
commit 6760e0c7bd05602de0483126ae51e9d6f63b4587 (HEAD -> yourbranchname, origin/yourbranchname)
Author: username
Date: Mon May 9 15:20:19 2022 +0200
Add intro-lattice-cryptography.md (our squashed commit which includes all the 3 other commits)
commit f9068940b8cb96647f306ba094b7931031b8b4fb (origin/main, origin/HEAD, main)
Author: username
Date: Mon May 9 13:09:53 2022 +0200
Update css style
```
### 2.8. Cherry pick
Cherry pick allows you to get a copy of specific commits from another branch to your branch.
Imagine that there is a bug in production, and is solved in a branch where we are also introducing other changes, but we don't want to move those changes yet into production. So, we want to 'cherry pick' from the branch the specific commit that fixes the bug, but without getting the rest of commits of that branch which introduces other features.
We can do this by:
```
git cherry-pick commithash
# where 'commithash' is the hash of the commit that we want to copy to our branch
```
### 2.9. Rebase branch
Imagine that we have started our branch two days ago, but during these last two days, the `main` branch has advanced and now has new commits that we don't have in our branch. We can "rebase" our branch to last `main` changes, and in this way, it would be like we started our branch after those last commits from `main`. (be careful, if the `main` branch last commits touch the same file lines than your branch, you could have "git conflicts")
Rebasing a branch to last `main` commits:
```
# first we go to the main branch:
git checkout main
# now we pull the last changes from the remote repository:
git pull origin main
# now we go back to our branch:
git checkout yourbranchname
# now we want to rebase our branch to last main version:
git rebase main
```
## 3. Examples
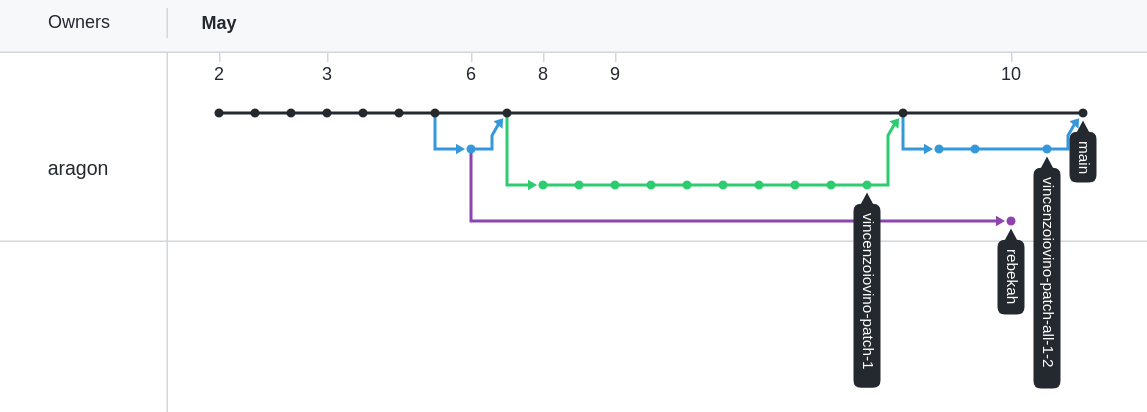
### 3.1. research-blog branches
Screenshot taken from [network graph of research-blog](https://github.com/aragon/research-blog/network) repository:
Usually, the name of the branch tries to reflect what you're adding in that branch (eg. if you're adding an introductory article on lattice cryptography, the branch can be named `intro-lattice-cryptography`).
If you're fixing something, it's a common practice to specify it in the branch name (eg. `fix/typo-lattice-article`).
If you want to move to an already existing branch, you can use:
```
git checkout the_already_existing_branch_name
```
### 2.3. Committing
We assume that we edited some files and we want to commit the changes, we'll use:
```python
# first let's check which files have changes:
git status
# to add the edited files:
git add .
# we can run again the 'status' command, to see that we added the edited files:
git status
# we're ready to commit the changes:
git commit -m "this is the commit message"
```
**Important**: The commit message should describe the changes that we are adding in the commit, so later when revisiting the git history logs, another person can get the context on what has been modifyied in each commit.
**Note 1**: the commit message can have multiple lines, the first line should not be longer than 50 characters.
To do a new commit with multiple lines, you can just use `git commit`, and your configured text editor will open to edit the commit message.
**Note 2**: notice that we committed the changes to our local version of the repository. The remote repository (eg. in Github) does not have our last commit yet.
### 2.4. Seeing the git history
```
git log
```
For other visualization useful tooling, check the [Useful terminal tools](#4-Useful-terminal-tools) section.
### 2.5. Pushing to the remote repository
We have committed some changes to our branch, and we want to push those changes to the remote repository (eg. hosted in Github).
In order to push to the remote branch:
```
git push origin yourbranchname
```
And now, from the Github web we can open a PullRequest (usually named 'PR').
### 2.6. Amending commits or how to modify the history
Imagine that we did a commit, but we want to 'edit' it. We can edit it with the 'amend' command:
```python
# once the files are edited, let's track the changes:
git add .
# now instead of creating a new commit, we amend the last one:
git commit --amend
# here the text editor will be triggered, so we can edit the commit message
```
If the old commit was already pushed to the remote repository (eg. Github), now our local commit looks different from the equivalent remote one (and their hashes will differ). If we are in a un-protected branch, we can force the push, which means that despite the remote repository already has the equivalent commit, we will overwrite it with our amended commit:
```
git push origin yourbranchname --force
```
Be aware, that with `--force` you're overwriting the remote commit, so is a flag that should be used with extreme care, as we could delete relevant code.
### 2.7. Rebase and Squash
Imagine that you have a git history that looks like:
```
commit 2547306f0bc9199f34ada8e72b706968752e94eb (HEAD -> yourbranchname, origin/yourbranchname)
Author: username
Date: Mon May 9 15:17:19 2022 +0200
Fix typo on the description
commit a2ab24314c86b7f8a6a980aa3b57dd5fe339b14e
Author: username
Date: Mon May 9 13:32:40 2022 +0200
Update intro-lattice-cryptography.md
commit 31aea34e1ab381ae14f5a97e189da12510896536
Author: username
Date: Mon May 9 13:21:01 2022 +0200
Update intro-lattice-cryptography.md
commit 2ca12c978966943f8400eccdc3f7703f78f77fed
Author: username
Date: Mon May 9 13:13:23 2022 +0200
Add intro-lattice-cryptography.md
commit f9068940b8cb96647f306ba094b7931031b8b4fb (origin/main, origin/HEAD, main)
Author: username
Date: Mon May 9 13:09:53 2022 +0200
Update css style
```
Assume that the last 4 commits are updates to the same file (`intro-lattice-cryptography.md`). In order to keep a more clean git history, we may want to combine all those 4 commits into a single one. We can do it with:
```
git rebase -i f9068940b8cb96647f306ba094b7931031b8b4fb
```
Notice that `f9068940b8cb96647f306ba094b7931031b8b4fb` is the hash of the commit previous to the one until where we want to edit the commits.
Now we will be displayed with the text editor showing the following:
```
pick 2ca12c9 Add intro-lattice-cryptography.md
pick 31aea34 Update intro-lattice-cryptography.md
pick a2ab243 Update intro-lattice-cryptography.md
pick 2547306 Fix typo on the description
```
We now can edit it changing the `pick` by `squash`/`s` at those commits that we want to squash with the previous one:
```
pick 2ca12c9 Add intro-lattice-cryptography.md
s 31aea34 Update intro-lattice-cryptography.md
s a2ab243 Update intro-lattice-cryptography.md
s 2547306 Fix typo on the description
```
With this, what we are doing is 'squashing' the 3 last commits into the first one (`2ca12c9`).
Now, if we run `git log`, we will see:
```
commit 6760e0c7bd05602de0483126ae51e9d6f63b4587 (HEAD -> yourbranchname, origin/yourbranchname)
Author: username
Date: Mon May 9 15:20:19 2022 +0200
Add intro-lattice-cryptography.md (our squashed commit which includes all the 3 other commits)
commit f9068940b8cb96647f306ba094b7931031b8b4fb (origin/main, origin/HEAD, main)
Author: username
Date: Mon May 9 13:09:53 2022 +0200
Update css style
```
### 2.8. Cherry pick
Cherry pick allows you to get a copy of specific commits from another branch to your branch.
Imagine that there is a bug in production, and is solved in a branch where we are also introducing other changes, but we don't want to move those changes yet into production. So, we want to 'cherry pick' from the branch the specific commit that fixes the bug, but without getting the rest of commits of that branch which introduces other features.
We can do this by:
```
git cherry-pick commithash
# where 'commithash' is the hash of the commit that we want to copy to our branch
```
### 2.9. Rebase branch
Imagine that we have started our branch two days ago, but during these last two days, the `main` branch has advanced and now has new commits that we don't have in our branch. We can "rebase" our branch to last `main` changes, and in this way, it would be like we started our branch after those last commits from `main`. (be careful, if the `main` branch last commits touch the same file lines than your branch, you could have "git conflicts")
Rebasing a branch to last `main` commits:
```
# first we go to the main branch:
git checkout main
# now we pull the last changes from the remote repository:
git pull origin main
# now we go back to our branch:
git checkout yourbranchname
# now we want to rebase our branch to last main version:
git rebase main
```
## 3. Examples
### 3.1. research-blog branches
Screenshot taken from [network graph of research-blog](https://github.com/aragon/research-blog/network) repository:
 ### 3.2. An example of a flow using a branch
The following steps, will lead to the following diagram of branches:
```python
git commit -m "Commit A"
git branch new-sig-scheme
git commit -m "Commit B"
git commit -m "Commit C"
git checkout new-sig-scheme
git commit -m "Add new hash"
git commit -m "Add sig generate"
git commit -m "Sig verif"
git checkout master
git merge new-sig-scheme
git commit -m "Use new sig"
```
### 3.2. An example of a flow using a branch
The following steps, will lead to the following diagram of branches:
```python
git commit -m "Commit A"
git branch new-sig-scheme
git commit -m "Commit B"
git commit -m "Commit C"
git checkout new-sig-scheme
git commit -m "Add new hash"
git commit -m "Add sig generate"
git commit -m "Sig verif"
git checkout master
git merge new-sig-scheme
git commit -m "Use new sig"
```
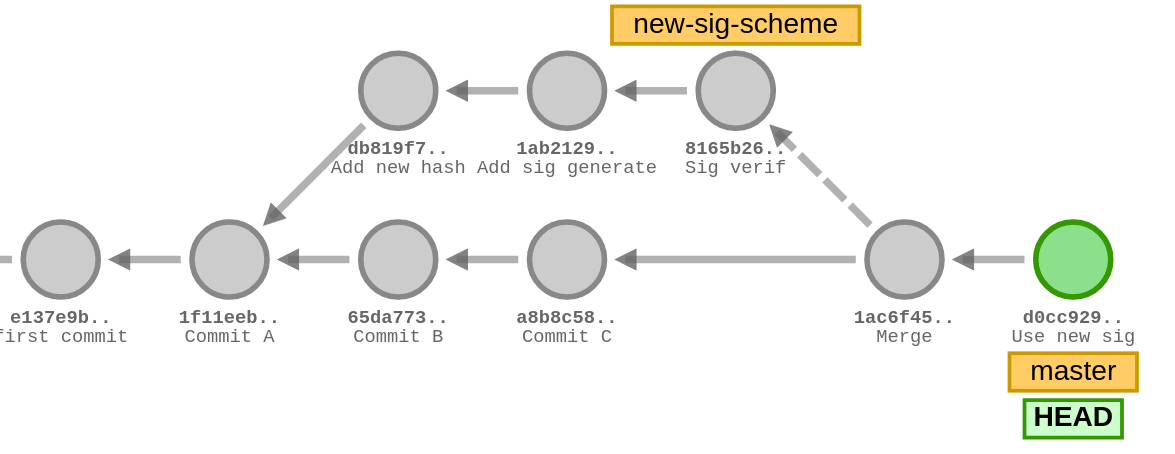 *(take in mind that the graph starts to left and goes to right, the arrows point backwards to represent that a commit has a pointer to the previous one)*
You can try to recreate this flow step by step in: https://git-school.github.io/visualizing-git/ .
## 4. Useful terminal tools
- [tig](https://jonas.github.io/tig/INSTALL.html): visit the diffs from the git history.
- [delta](https://github.com/dandavison/delta): git diff syntax highlighting tool (highly customizable).
- `gitg`: useful to print an overview of the git history with a small diagram of the branches. To use it, add to your `.bashrc`/`.zshrc` file:
```
alias gitg="git log --color --graph --abbrev-commit --pretty=format:'%Cred%h%Creset%C(yellow)%d%Creset %s %Cgreen(%ar)%C(cyan) %an<%ae>%Creset'"
```
- `git wip`: useful to print the last branches that you worked on locally.
- in your `.gitconfig` file, you can add the following lines to add the `git wip` command:
```
[alias]
wip = for-each-ref --sort='authordate:iso8601' --format=' %(color:green)%(authordate:relative)%09%(color:white)%(refname:short)' refs/heads
```
## 5. Useful resources
This document contains just an overview of some of the useful commands available in git, but is worth to spend some time reading the git docs or doing a tutorial on it.
- Git tutorial: https://www.w3schools.com/git/git_intro.asp
- Git visualizing tool: https://git-school.github.io/visualizing-git/ . This resource is useful to play a bit while visualizing how the commits and branches look like.
- Git docs: https://git-scm.com/doc
## Acknowledgements
Many thanks to Edu ([@ed255](https://github.com/ed255)) who showed me some of the git commands and tools that appear in this document.
*(take in mind that the graph starts to left and goes to right, the arrows point backwards to represent that a commit has a pointer to the previous one)*
You can try to recreate this flow step by step in: https://git-school.github.io/visualizing-git/ .
## 4. Useful terminal tools
- [tig](https://jonas.github.io/tig/INSTALL.html): visit the diffs from the git history.
- [delta](https://github.com/dandavison/delta): git diff syntax highlighting tool (highly customizable).
- `gitg`: useful to print an overview of the git history with a small diagram of the branches. To use it, add to your `.bashrc`/`.zshrc` file:
```
alias gitg="git log --color --graph --abbrev-commit --pretty=format:'%Cred%h%Creset%C(yellow)%d%Creset %s %Cgreen(%ar)%C(cyan) %an<%ae>%Creset'"
```
- `git wip`: useful to print the last branches that you worked on locally.
- in your `.gitconfig` file, you can add the following lines to add the `git wip` command:
```
[alias]
wip = for-each-ref --sort='authordate:iso8601' --format=' %(color:green)%(authordate:relative)%09%(color:white)%(refname:short)' refs/heads
```
## 5. Useful resources
This document contains just an overview of some of the useful commands available in git, but is worth to spend some time reading the git docs or doing a tutorial on it.
- Git tutorial: https://www.w3schools.com/git/git_intro.asp
- Git visualizing tool: https://git-school.github.io/visualizing-git/ . This resource is useful to play a bit while visualizing how the commits and branches look like.
- Git docs: https://git-scm.com/doc
## Acknowledgements
Many thanks to Edu ([@ed255](https://github.com/ed255)) who showed me some of the git commands and tools that appear in this document.